CSS in Dreamweaver - The Power of Design
Cascading Style Sheets are powerful tools to format and design web pages that are consistent in style and display. The only formatting that you have performed thus far has been using HTML styles. HTML styles use HTML tags to apply formatting. One of the problems with HTML styles is that they are applied directly to each object and thus changes must be made to each and every instance of that particular HTML style. The solution is the creation and use of Cascading Style Sheets.
Cascading style sheets make pages smaller and faster to load (since the pages are no longer cluttered with all that HTML style information). They also allow for entire site updates by changing a single document, the style sheet. The future of formatting is in the use of CSS and any web designer must be proficient in the use and application of CSS.
Dreamweaver allows for the creation of style sheets through a dialogue window that provides eight different categories with over 70 different CSS attributes to choose from. The creation and application of style sheets is quick and simple in Dreamweaver. Recall that there are three different types of style sheets, external, internal and embedded. In this lab you will create the most common type, the external style sheet. You will then apply that style to your parks template page and in doing so apply it to all pages based on that template.
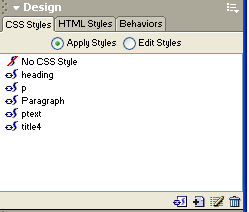
1. Open Dreamweaver and from the pull down menu select Window > CSS Styles to open the design panel. Click on the first tab, CSS Styles. What are the two radio buttons on this tab?
2. What are the four buttons at the bottom of this panel?
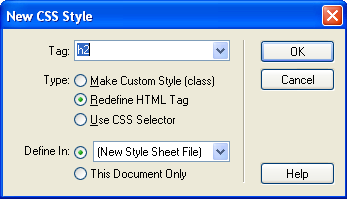
3. Open your spotlight_parks.dwt template page. Move the cursor down to the Spotlight on [name of state park text. Select the <h2> tag from the tag selector line. Now click on the New CSS Style button (second button on the bottom of the Design panel, has a + on it), this will open the New CSS Style dialog window.
4. Set the following in the dialog window: Define In: New Style Sheet File
Type: Redefine HTML tag
Tag: h2
Click OK5. When the Save Style Sheet File As dialog box opens save the style as spotlight in your project06 folder. Typically in a web site you will create a folder called css in which you will save all of your css files. Click OK.
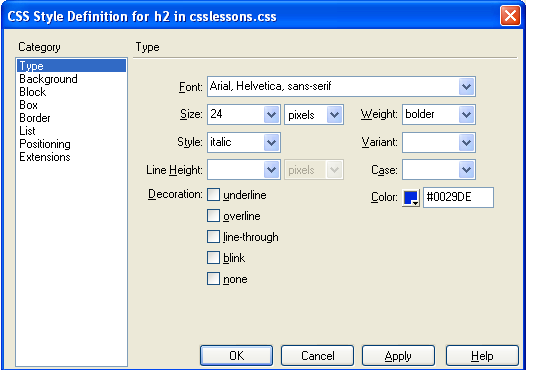
6. In the CSS Style Definition window set the styles to match those shown in the graphic.
7. Click OK. If the style is not visible in the Design Panel then select the Edit Styles button and your new style should show up as h2 in the Design Panel.
Creating a Style for Paragraph Text
Intro to CSS | Creating a Style for Paragraph Text | Creating a Style for Links


