Introduction to Flash
MX
Flash MX is the 6th version of Flash, which began as an animation tool for
the web, and is now a multimedia tool for creating Web content, as well as animation.
Flash allows you to create interactive websites, show video files and play audio
files. A Flash plug-in is required to allow a browser (e.g.,
Internet Explorer or Netscape) to play Flash files. The good news is that at
least 70% of viewers have a Flash plug-in. (Macromedia claims 98% have one.)
You do need to keep file size in mind however. The majority of viewers still
do not have cable or DSL, and they will not wait forever for a page to load.
Visit a few of the following web sites and answer these questions.
www.axix-media.com
firstbornmultimedia.com/websites/chr/crossfire.htm
www.panasonic.com
www.ry-guy.com
http://www.travelclick.net/index.cfm
www.chukchansigold.com/flash.html
1. What site did you visit?
2 . Describe how flash makes these sites more dynamic and inviting.
3 . List several of the things that flash adds to this site.
4. Find two web sites that use flash anywhere in the site. Write down the URL for each and describe what the flash animation adds to the site.
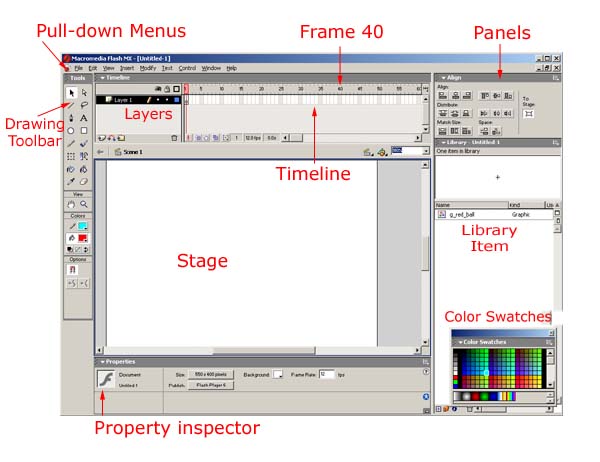
Now take a look at the Flash MX screen below. We have already covered an introduction
to Dreamweaver MX. So, much of the screen should be familiar. You understand
pull-down menus, layers, drawing toolbars and color swatches.

In the Flash screen, everything takes place on the stage. (If you do
not see the stage, select File - New.) You draw on the stage, and you drag images
and objects to the stage. The layers appear at the top of the Flash
screen. Each layer has its own timeline where actions take place. The
timeline is broken up into frames. (Think of a frame as a page in a
flip book. As viewers flip through the book, they see motion as the images change
from page to page. Of course, Flash is much more sophisiticated - you won't
need to place an image in each frame to see motion, but you could.)
All of the images and objects that Flash uses are kept in the
Library. In Flash, objects in the library are known as
symbols. Instances (copies) of a symbol can be used multiple
times and in multiple frames, but the symbol's size will only be added to the
filesize once.
Flash has many moveable panels. When you open Flash MX for the first
time, you may want to close most of the panels. Always keep the Property
inspector panel open at the bottom of the screen; it displays the properties
for a selected object. To close a panel, right-click on the title bar and select "Close Panel." To open a panel, select the Window pull-down menu and click on
the desired panel name. To move a panel and resize it, click on the dots at
the left of the panel's title bar and drag it to the stage. (You will now be
able to drag it on top of other panels.) The down-pointing arrow at the left
of the panel's title bar allows you to collapse the panel. The pull-down
at the right of the panel's title bar allows you to access help features
for the panel.
![]()

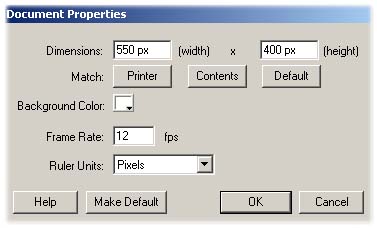
Select Modify - Document to look at/change the document properties. The dimensions
are the dimensions of the stage. Please do not change the defaults as you may
want to go back to the original settings.
- To specify the Stage size in pixels, enter values in the Width and Height
text boxes.
- The default movie size is 550 x 400 pixels. The minimum size is 1 x 1
pixels; the maximum is 2880 x 2880 pixels.
- To set the Stage size so that there is equal space around the content on
all sides, click the Contents button to the right of Match. To minimize movie
size, align all elements to the upper left corner of the Stage, and then click
Contents.
- To set the Stage size to the maximum available print area, click Printer.
This area is determined by the paper size minus the current margin selected in
the Margins area of the Page Setup dialog box (Windows) or the Print Margins
dialog box (Macintosh).
- To set the Stage size to the default size, click Default.
The frame rate is the number of frames per second. At 12 fps, you would need
72 frames for a 6 second movie. For now, let's leave it at 12 fps. In fact,
let's leave all of the settings at the default settings. (Notice that the document
properties also appear in the Property inspector panel.)
5. Change the properties of your stage so it is 800pixels
wide and 200pixels high. Give the stage a background color of #3399FF. Show
your answers to questions 1-3 and your stage to your instructor for teacher
check.
Now that you know what the Flash MX screen looks like, it is time to create
your first Flash file!
Back to Flash Index

